Challenge Overview
Welcome to "E2E Maps Process - New Map UI Frontend Challenge #2". In this challenge, we need your help to translate the remaining design screens for new map interactIons to our existing E2E Process Map prototype. Read the challenge specification carefully and watch the forums for any questions or feedback concerning this challenge. Let us know if you have any questions in the challenge forum!
We ran the first part of this app here and the winning submission codebase is provided in the forums. You need to work off the provided codebase.
This application is hosted in the cloud and accessible via browser and mobile, and for the first phase, we are starting with browser access from a standard windows laptop, as mobile app use at this company is not completely mature yet. We will, however, roll out a mobile app version of this software, and ask that the web app is created with future capability with tablets/phones in mind.General Requirements
We ran a design challenge earlier this month to build out the new design for Map interactions. This was followed by a prototype challenge which implemented some of the admin user. In this challenge, we’ll build the remaining admin screens and end user screens.Allowed Technologies
-
jQuery
-
Javascript
Code Requirements
HTML/HTML5
-
Provide comments on the page elements to give clear explanation of the code usage. The goal is to help future developers understand the code.
-
Please use JSON files for data where applicable so the backend calls can be replaced appropriately during integration phase
-
Please use clean INDENTATION for all HTML code so future developers can follow the code.
-
All HTML code naming should not have any conflicts or errors.
-
Element and Attribute names should be in lowercase and use a "-" or camel naming to separate multiple-word classes (i.e. "main-content", or "mainContent)
-
Use semantically correct tags- use H tags for headers, etc. Use strong and em tags instead of bold and italic tags.
-
No inline CSS styles- all styles must be placed in an external stylesheet.
-
Validate your code- reviewers may accept minor validation errors, but please comment your reason for any validation errors. Use the validators listed in the scorecard.
CSS3
-
Provide comments on the CSS code. We need CSS comments to give a clear explanation of the code usage. The goal is to help future developers understand the code.
-
Please use clean INDENTATION for all CSS so developers can follow the code.
-
All CSS naming should not have any conflicts.
-
As possible use CSS3 style when create all styling.
-
Use CSS to space out objects, not clear/transparent images (GIFs or PNGs) and use proper structural CSS to lay out your page. Only use table tags for tables of data/information and not for page layout.
Javascript
-
You are encouraged to use your own scripts.
-
Open Source may be leveraged so long as usage is in compliance with the open source license.
-
We may ask you to provide us with a list of third party code used.
Images
-
Images should be properly compressed while still having good visual quality.
-
Please use best practice repetition usage of background based image.
-
Please use the Material Design icon font when using icons for your submission.
-
Make sure your submission look sharp for Retina and Standard devices
Challenge Assets
We’ve provided the following in challenge forums
-
Link to shared Marvelapp Storyboard
-
Design Sources
-
Existing prototype source code
Enhancements
-
Logout Flow
-
Currently, clicking the user’s image logs out the user. This is poor user experience - show a menu drawer on clicking the user’s image with the text ‘Logout’
-
On clicking ‘Logout’, show a modal dialog - ‘Are you sure you want to logout?’
-
Selecting ‘Yes’ will navigate the user back to login page
-
Selecting ‘No’ will dismiss the modal dialog
-
Empty vs. Non-Empty Nodes
-
The prototype needs to be able to distinguish between empty & non-empty nodes. You can configure some nodes as empty via your JSON file. The key difference in empty vs. non-empty nodes is the context menu options
Empty node has the following options
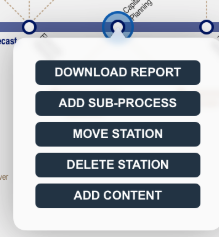
Non-empty node has the following options

Currently, only the ‘Add Station’ option is implemented. The behavior of other options is described below
-
Add Content - This should open 03_02_01_00_Managing_Content_Deployments screen
-
Edit Content - This should open 06_01_02_Managing_Content_Existing_list screen
-
Delete Content - Should show a modal dialog - ‘Are you sure you want to delete this content?’
-
Selecting ‘Yes’ will remove the associated content with this station & it should then show ‘Add Content’ option instead of ‘Edit Content’ & ‘Delete Content’
-
Selecting ‘No’ will dismiss the modal dialog
-
-
Add Sub-Process - Disable this option
-
Move Station - Show a modal dialog with ‘Station moved’ text on choosing this option
-
Delete Station - Delete the corresponding station & re-render the map. E.g. if the line has 3 stations A-B-C and B is deleted, then A-C should be the new line connection
Screen Requirements
The prototype must implement the following screens.You need to ensure that all admin screens mentioned below are implemented.
03_02_01_00_Managing_Content_Opportunities
-
See B) above on how this screen is triggered
-
Show names & sample icons in dropdown list
-
‘Text’ is a text field limited to 100 characters
-
‘Description’ - please use a rich text editor (like CKEditor) for this. Limit to 500 characters
-
Allow user to drag & drop files in ‘Attach Files’ section. Alternatively, user can click click here to browse’ and select files. Restrict files to .tiff, .eps, .psd, .jpg, .png or .gif
-
Once user has filled all the info, they are navigated to 03_02_01_00_Managing_Content_Deployments_filled
-
Clicking on ‘New Icon’ navigates the user to 04_01_Icon_Management_Edit
03_02_01_00_Managing_Content_Opportunities_Filled
-
Shows the earlier screen with content filled in by the user
-
Text, Description, Icon are mandatory fields
-
Attach files must show Names of files (up to 3) as shown in storyboard
-
Clicking ‘x’ in Attach files section must remove that file from the view
-
No action required on ‘Manage Permissions’ - ‘Open’ button
-
Clicking ‘Cancel’ dismisses the view and navigates user back to previous screen
-
Clicking ‘Submit’ should validate the mandatory fields and then navigate the user to 03_02_01_02_Manage_content_Deployment_Details
03_02_01_02_Manage_content_Deployment_Details
-
Clicking the below icon should dismiss the overlay ‘1 BOT IN PRODUCTION’ - this state is shown in screen 03_02_01_03_Manage_content_Deployment_Closed
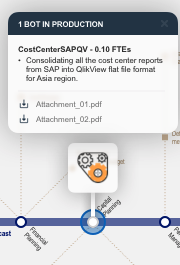
03_02_01_03_Manage_content_Deployment_Closed
-
Shows the toggled state from earlier screen
03_02_01_04_Manage_content_Deployment_Opened
-
Shows an example of deployment overlay opened on another node. Toggle will work same as described above
03_02_02_Managing_Content_Opportunities
-
Clicking the ‘Opportunities’ tab in 03_02_01_01_Managing_content_Deployment screen opens this
-
Allow user to select icons for 1st, 2nd and 3rd places
-
Clicking ‘remove’ should remove that section from the view
-
No action required on ‘Manage Permissions’ - ‘Open’ button
-
No action required on ‘add new opportunity’
03_02_03__00_Managing_Content_UseCases
-
Clicking the ‘Use Cases’ tab in 03_02_01_01_Managing_content_Deployment screen opens this
-
This screen works exactly the same as 03_02_01_00_Managing_Content_Opportunities_Filled
03_02_03__01_Managing_Content_UseCases_Filled
-
Works exactly the same as 03_02_01_00_Managing_Content_Opportunities_Filled
03_02_03__02_Managing_Content_UseCases_Details
-
Works exactly the same as ‘Deployments Details’ screen - 03_02_01_02_Manage_content_Deployment_Details
03_02_Managing_Content_on_Empty_node
-
Already covered in Section B)
03_03_01_Managing_Content_on_sub_process
-
Same options shown as 03_02_Managing_Content_Emty_node on a sub-process
04_01_Icon_management_edit
-
Clicking ‘New Icon’ on any screen navigates the user to this screen
-
See the Marvelapp notes for details
-
User should be able to filter the list of icons based on icon name - should support filtering as the user types each character
-
Clicking the pencil button for each icon should allow setting/ unsetting the checkboxes corresponding to each icon
-
Clicking ‘Delete’ should remove that icon row
-
Clicking ‘Save’ should dismiss the ‘Manage Icons’ modal
04_02_Icon_management_add
-
Clicking ‘Add new icons’ - should allow user to drag & drop or select an icon file. Please refer to valid file types mentioned earlier
-
Import from URL - validate that this is a well-formed web URL
-
Clicking ‘Cancel’ dismisses the modal
-
Clicking ‘Submit’ - show a modal ‘Icon has been added’
04_03_Icon_management_search
-
Clicking ‘Search Icons’ opens this screen
-
Show all elements as in storyboard
-
Clicking ‘Cancel’ dismisses the modal
-
Clicking Import - show a modal Selected icons have been imported’
06_01_01_Managing_Content_editing_existing_popup
-
Already covered in Section B)
06_01_02_Managing_Content_editing_existing_list
-
Clicking ‘Add New Use Case’ navigates the user to 06_01_03_Manage_Content_editing_existing_add_new screen
-
Clicking Delete icon should remove that icon row from the view
-
Clicking ‘Edit’ must allow editing the name of the icon
-
Clicking ‘Lock’ has no effect
06_01_03_Managing_Content_editing_existing_add_new
-
This screen works exactly the same as 03_02_01_00_Managing_Content_Deployments screen
06_01_04_Managing_Content_editing_existing_list_filled
-
This screen works exactly the same as 03_02_01_01_Managing_Content_Deployments_filled screen
06_02_Managing_Content_editing_existing_list_deployment
-
This screen works exactly the same as 06_02_01_Managing_Content_editing_existing_list
05_01_Settings_Default
-
Clicking on Settings (gear) icon in top bar opens this screen
-
Clicking ‘x’ must close this modal
-
Icon Management has already been covered in 04_xx screens
05_02_User_Management_Users
-
Clicking on ‘User Management’ in 05_01 opens this screen
-
List view works similar to earlier screens. Clicking Pencil icon must allow editing Name, Email or Active status for any user
-
Clicking ‘Delete’ must remove that user from list view
05_03_User_Management_User_groups
-
List view works similar to earlier screens. Clicking Pencil icon must allow editing properties in any row
-
Clicking ‘Delete’ must remove that user group from list view
05_04_User_Management_User_members
-
List view works similar to earlier screens. Clicking Pencil icon must allow editing properties in any row
-
Clicking ‘Delete’ must remove that user group from list view
05_05_Permission_Management
-
List view works similar to earlier screens. Clicking Pencil icon must allow editing properties in any row
-
Clicking ‘Delete’ must remove that user group from list view
These are the end-user screens that need to be implemented
-
Same as admin login screens. No changes needed except configuring an end-user in JSON files
End_User_01_01_Default_Map_May_Only
-
Follow the storyboard (similar to admin map screen)
End_User_01_02_Default_Map_Content
-
Follow the storyboard (similar to admin map content screen)
End_User_01_03_Default_Map_Content_toggle_layers
-
Follow the storyboard (similar to admin map toggle layers screen)
End_User_01_04_Default_Map_View_Download
-
Follow the storyboard (notice the options are different as compared to admin user)
End_User_01_05_Default_Map_line_highlighted
-
Follow the storyboard (similar to admin map line highlighted screen)
End_User_02_01_Process_view_Map_Only\
-
Follow the storyboard (similar to admin map view only screen)
End_User_02_02_01_Process_view_Deployment_Details
-
Follow the storyboard (similar to admin process view deployment details screen)
End_User_02_02_02_Process_view_Deployments
-
Follow the storyboard (similar to admin process view deployment screen)
End_User_02_03_Process_view_Opportunities
-
Follow the storyboard (similar to admin process view opportunities screen)
End_User_02_04_01_Process_view_Use_case_details_icon1
-
Follow the storyboard (similar to admin process view use cases screen)
End_User_02_04_01_Process_view_Use_case_details_icon2
-
Follow the storyboard (similar to admin process view use cases screen)
End_User_02_04_02_Process_view_Use_case_details_more_icons
-
Follow the storyboard (similar to admin process view use cases screen)
-
Shows another example of use case icons
End_User_02_04_02_Process_view_Use_case_details_icon_description
-
Follow the storyboard
End_User_02_04_Process_view_Use_case
-
Follow the storyboard (similar to admin process view use cases screen)
-
Shows the toggle operation (works same way for admin role)
End_User_03_01_Download_Report
-
Clicking a node shows ‘Download Report’ option
-
No action on clicking this button
Final Submission Guidelines
Submission/ Review
-
Zipped Frontend code
-
Readme file with instructions on how to run and use it.
Scorecard
-
Standard Code scorecard applies
-
Must comply with the stated requirements.