Challenge Overview
Welcome to the TOSCA POC - III | Constraints Editor Challenge. In this challenge, we are looking for you to enhance the POC application based on Angular 2+ framework with the requirements listed below.
Let us know any question you have!
Technology stack
- Angular 7
- NodeJS
- HTML
- SCSS
- JavaScript
General requirements
Layout
- The POC should support resolutions 1920px x 1080px and above.
- The application layout should appear somewhat similar to the sides provided.
- It's NOT required to exactly match font, font-size, color, element dimension, etc because the focus is mainly on the POC functions.
Framework specific
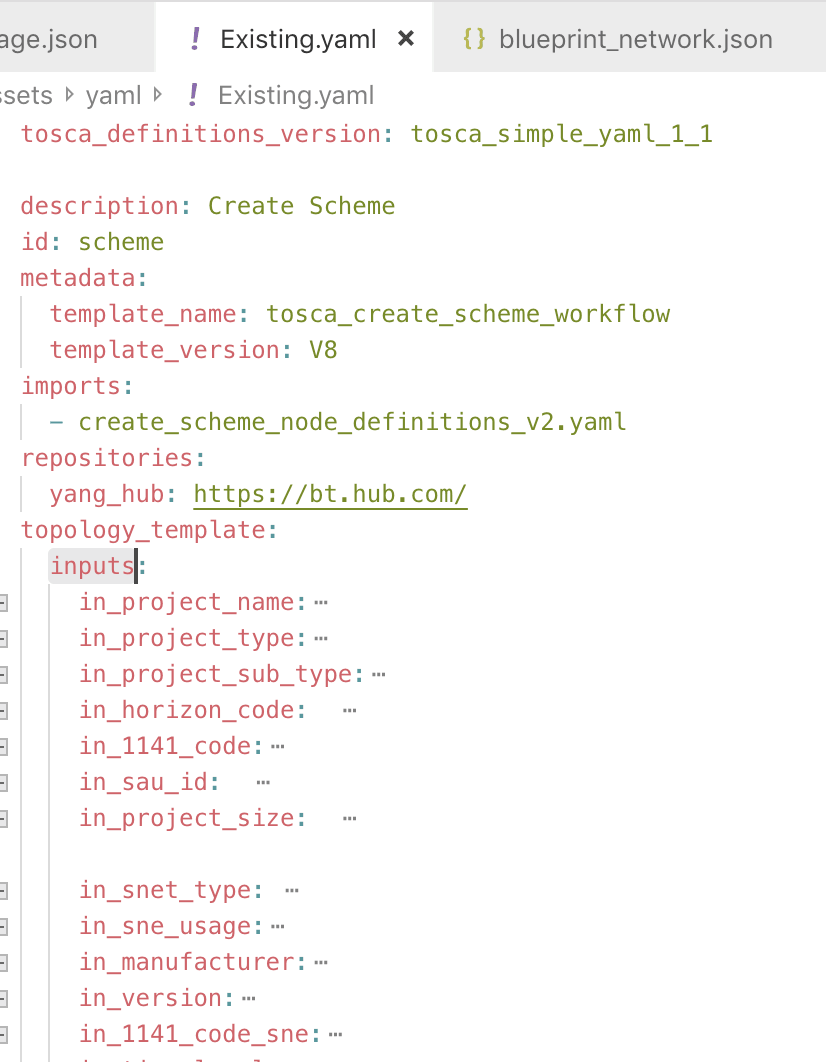
- Imp!: Blueprint data should be fetched from YAML file for other application data JSON format mock files can be used.
- Use Observable & Observable.subscribe() method wherever applicable. You may refer this: https://angular.io/tutorial/toh-pt4#subscribe-in-heroescomponent
- Use Dependency Injection coding pattern.
- ng build should work without throwing any error.
Code formatting
- Make sure code is well documented, all classes, methods, variables, parameters, return values must be documented in every single code file, and appropriate inline comments should be provided too where the code is not straightforward to understand.
- Please use clean INDENTATION for all HTML code so future developers can follow the code.
- Use appropriate linter to validate your code.
HTML Specific
- HTML should be valid HTML5 compliant.
- All HTML code naming should not have any conflicts or errors.
- Element and Attribute names should be in lowercase and use a '-' or camel naming to separate multiple-word classes (i.e.. 'main-content', or 'mainContent)
- Use semantically correct tags- use H tags for headers, etc. Use strong and em tags instead of bold and italic tags.
- No inline CSS styles- all styles must be placed in an external stylesheet.
CSS Specific
- Use CSS3 Media Queries to load different styles for each page. Do not build a different page for different device/layout.
- You may use SCSS in the project.
Platform
- Desktop: Chrome latest, Firefox latest (Mac & Windows), Safari latest (Mac), IE11+ (Windows), MS Edge
- IE11 is the primary browser.
App Requirement
0 Resources & links
1. Storyboard:

Only the sections listed below are in scope.
- It's the sidebar section.
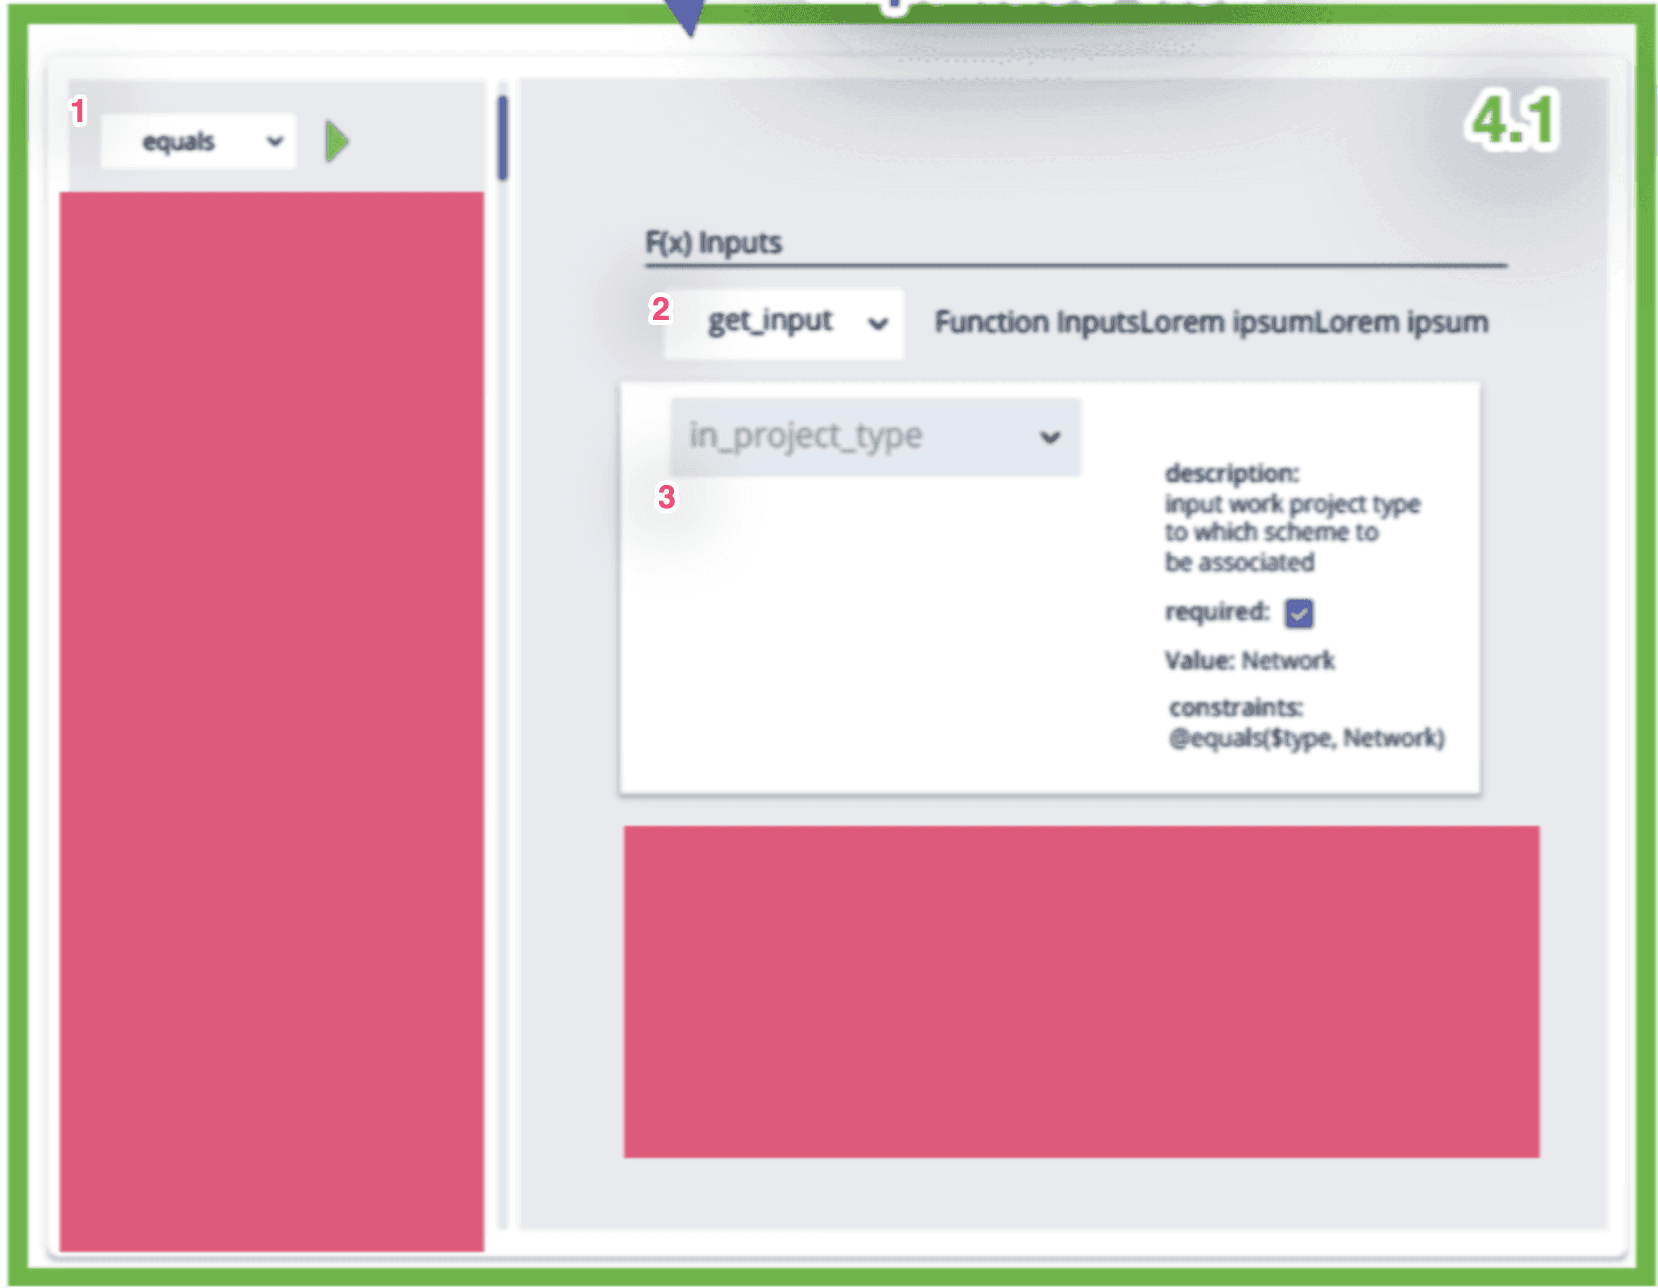
- This is the Detailed view of selected Input (from above img: in_project_type node) from the sidebar. This shoudl be developed it as a resuable component that can be used in multiple screens.
- This is the constraints nodes detailed view for the selected Input (from above img: in_project_type node).
- This represents the function @equals(parameter1, parameter2)
- 5, 6 & 7 represents similar functions.
- 4.1 Constraint editor: It the detailed view of 4. Refer to the workflow here for more.
2. Existing Submission overview
- Importing blueprint YAML & creating sidebar structure has already been done in the previous challenge.
2. Updating sidebar section's Inputs node.
- The sidebar section's inputs node should show more details. You can get these details form the YAML file. Rere to Storyboard-1.1 Sidebar section.
3. Main View
3.1 Inputs
- Clicking any Sidebar > Inputs > tree node should show the details of that node in the right side main view. In the image above the details of the node in_project_type is displayed.
- Values of Name, Type, Required Description & Value Editor should be based on the selected node. All these values are static & read-only.
3.2 Constraints list (1.Storyboard > 3)
- This should list all constraints of the selected node.
ref:

4 Constraint Editor
Ref:
- Constraint editor is a reusable component. Here we are showing its use in inputs.
For now there are 2 cases here:
Case-1
- Constraint value: @equals($var, Network)
ref:
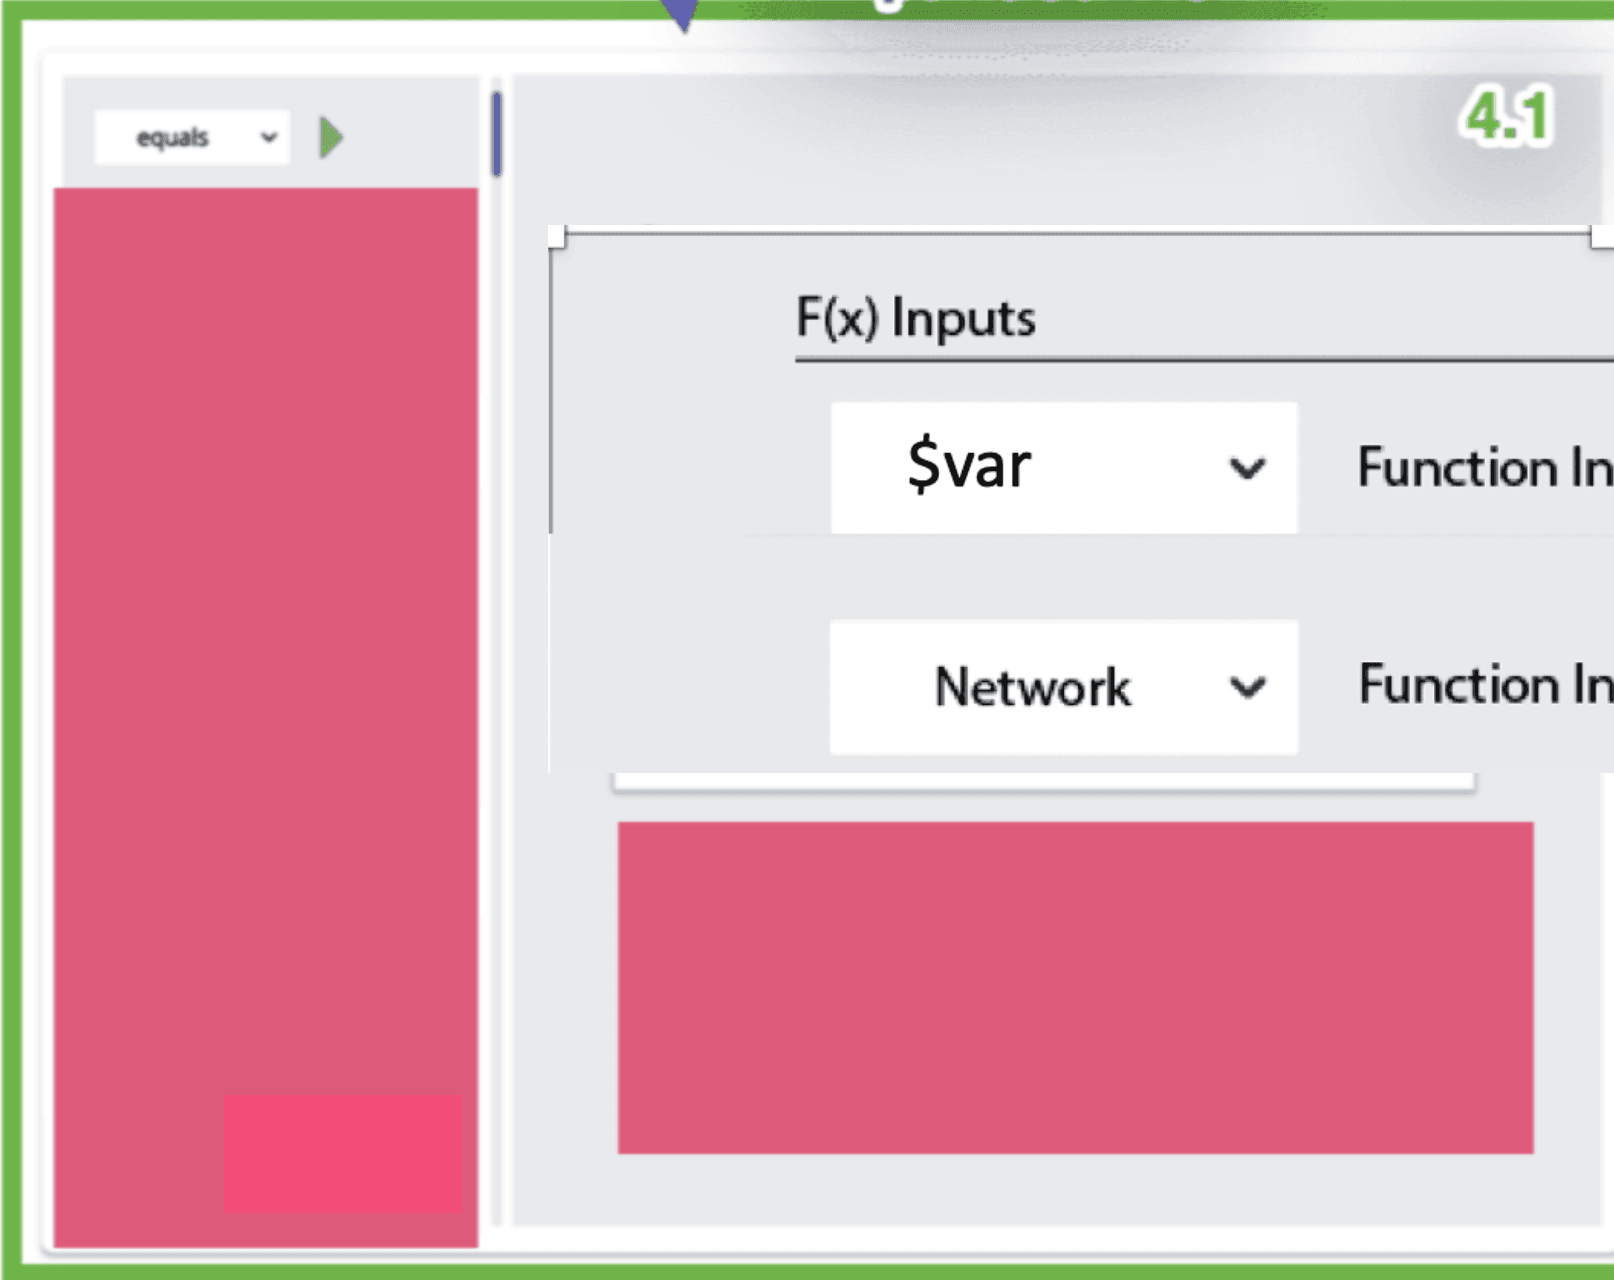
- Both the input controls represents a compination drop-down & text input field. User can type text or select an item from the drop-down list. The drop-down options can be hard-coded, for now it has only on drop-donw options (i.e. get_type)
- The '@eqalsdrop-down option values of come frombase.yaml` file provided in the forum.
- User has entered $var in the 1st input control.
- User has entered Network in the 2nd input control.
Case-2
- Constraint value: `@equal(get_input(). Network)
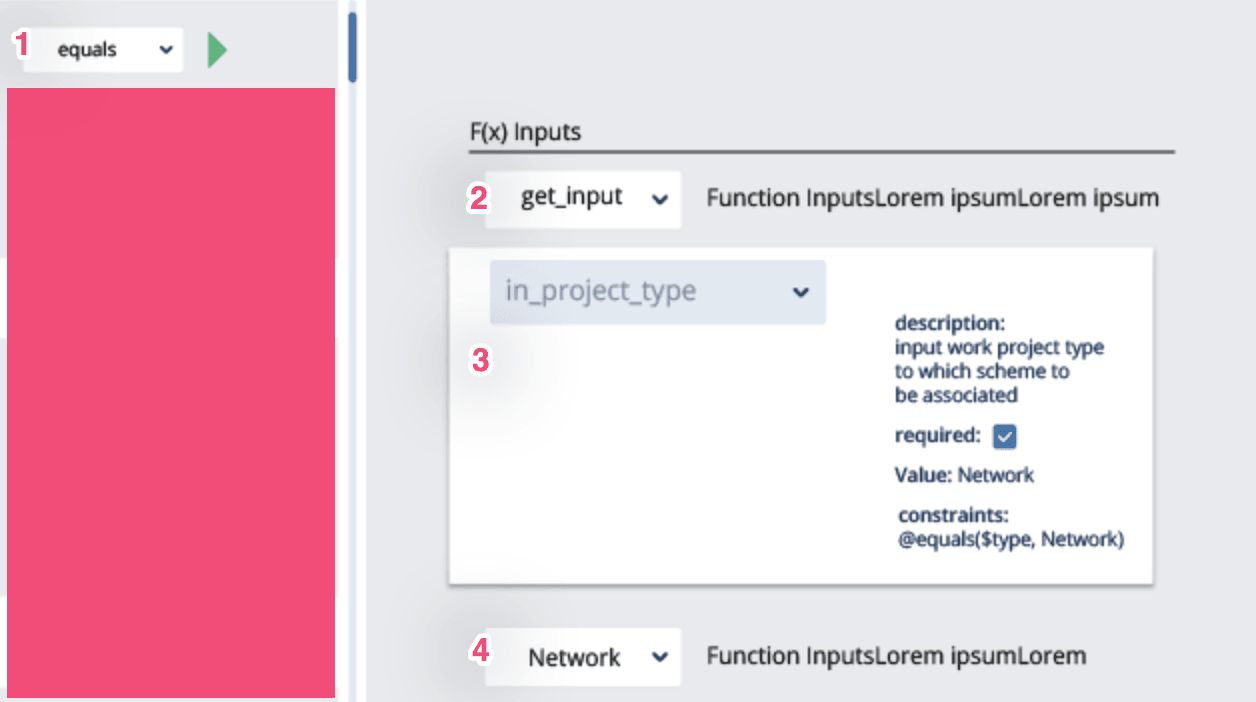
- The @eqals drop-down option values of come from base.yaml file provided in the forum.
- In this case the user has selected get_input.
- Section 3 appears because user has selected get_input, other other values this should be hidden. The dropdown here should list all the Inputs from the current blueprint. Values of select Input is also displayed in this section. Ref to the image below.
ref:
User has typed Network In this input control.
When a user updates any of these input values, the YAML/JSON data should automatically update in the background. If user clicking View YAML or Download button then she should be able to get the YAML based on the current state.
5. Navigation to different Inputs list items
- When a user navigates to different Input list items in the sidebar, then the main area content changes based on the selected node.
- If the user goes back to any previously edited node, then the changes there should be preserved. You can user local-storage if needed.
6. View Yaml & Download
- Clicking the View YAML button should show the YAML content in the editor based on the updated data.
- Clicking the Download button should download the YAML file based on the updated data.
Final Submission Guidelines
- Full source code with all the requirements implemented.
- Detailed readme in markdown format that describes how to configure, build and run the app.
- Verification video or doc is NOT required
Licenses & attribution
- Third-party assets used to build your item must be properly licensed or free for commercial use. MIT, some modified BSD, Apache 2 licenses are ok. If a library is not commercial friendly you will need to get our approval first.
- Sufficient information regarding third-party assets must be present in your documentation. This includes the author, license info and a direct link to the asset online.
FAQs
After submission as a submitter what should be my next step?
Once the challenge submission phase is over the assigned reviewers are going to review all the submissions based on the challenge scorecard. They are expected to raise all issues found in the submissions they are reviewing. After the completion of review phase the Appeal phase status. In this phase, the submitters should go to the Online Review page, select the project & have a look at the issues raised by the reviewers. If you disagree with the reviewer on any issue/comment, raise an appeal by clicking the 'Appeal' button associated with the section and entering the appeal comment.
When & where I can see the challenge results?
After the Appeal response phase is over the results are displayed on the challenge specification page as well as on the online reivew page.