Challenge Overview
Welcome to the TOSCA Policies and Workflows POC Challenge. In this challenge, we are looking for you to create the TOSCA Policies and Workflows POC application using Angular 2+ framework based on the requirements listed below.
In the previous challenges Challenge 1 , Challenge 2, Challenge 3, Challenge 4, Challenge 5, Challenge 6 & Challenge 7 we have developed Constraint Editor & valiue editor. Here are going to use those while creating the Policies & Workflows POC.
Let us know any question you have!
Technology stack
- Angular 7
- NodeJS
- HTML
- SCSS
- JavaScript
General requirements
Layout
- The POC should support resolutions 1920px x 1080px and above.
- The application layout should appear somewhat similar to the sides provided.
- It's NOT required to exactly match font, font-size, color, element dimension, etc because the focus is mainly on the POC functions.
Framework specific
- Imp!: Blueprint data should be fetched from YAML file for other application data JSON format mock files can be used.
- Use Observable & Observable.subscribe() method wherever applicable. You may refer this: https://angular.io/tutorial/toh-pt4#subscribe-in-heroescomponent
- Use Dependency Injection coding pattern.
-
ng buildshould work without throwing any error.
Code formatting
- Make sure code is well documented, all classes, methods, variables, parameters, return values must be documented in every single code file, and appropriate inline comments should be provided too where the code is not straightforward to understand.
- Please use clean INDENTATION for all HTML code so future developers can follow the code.
- Use appropriate linter to validate your code.
HTML Specific
- HTML should be valid HTML5 compliant.
- All HTML code naming should not have any conflicts or errors.
- Element and Attribute names should be in lowercase and use a '-' or camel naming to separate multiple-word classes (i.e.. 'main-content', or 'mainContent)
- Use semantically correct tags- use H tags for headers, etc. Use strong and em tags instead of bold and italic tags.
- No inline CSS styles- all styles must be placed in an external stylesheet.
CSS Specific
- Use CSS3 Media Queries to load different styles for each page. Do not build a different page for different device/layout.
- You may use SCSS in the project.
Platform
- Desktop: Chrome latest, Firefox latest (Mac & Windows), Safari latest (Mac), IE11+ (Windows), MS Edge
- IE11 is the primary browser.
App Requirement
0 Resource & links
- Existing app & reference docs are attached in the challenge forum.
1 Storyboard:
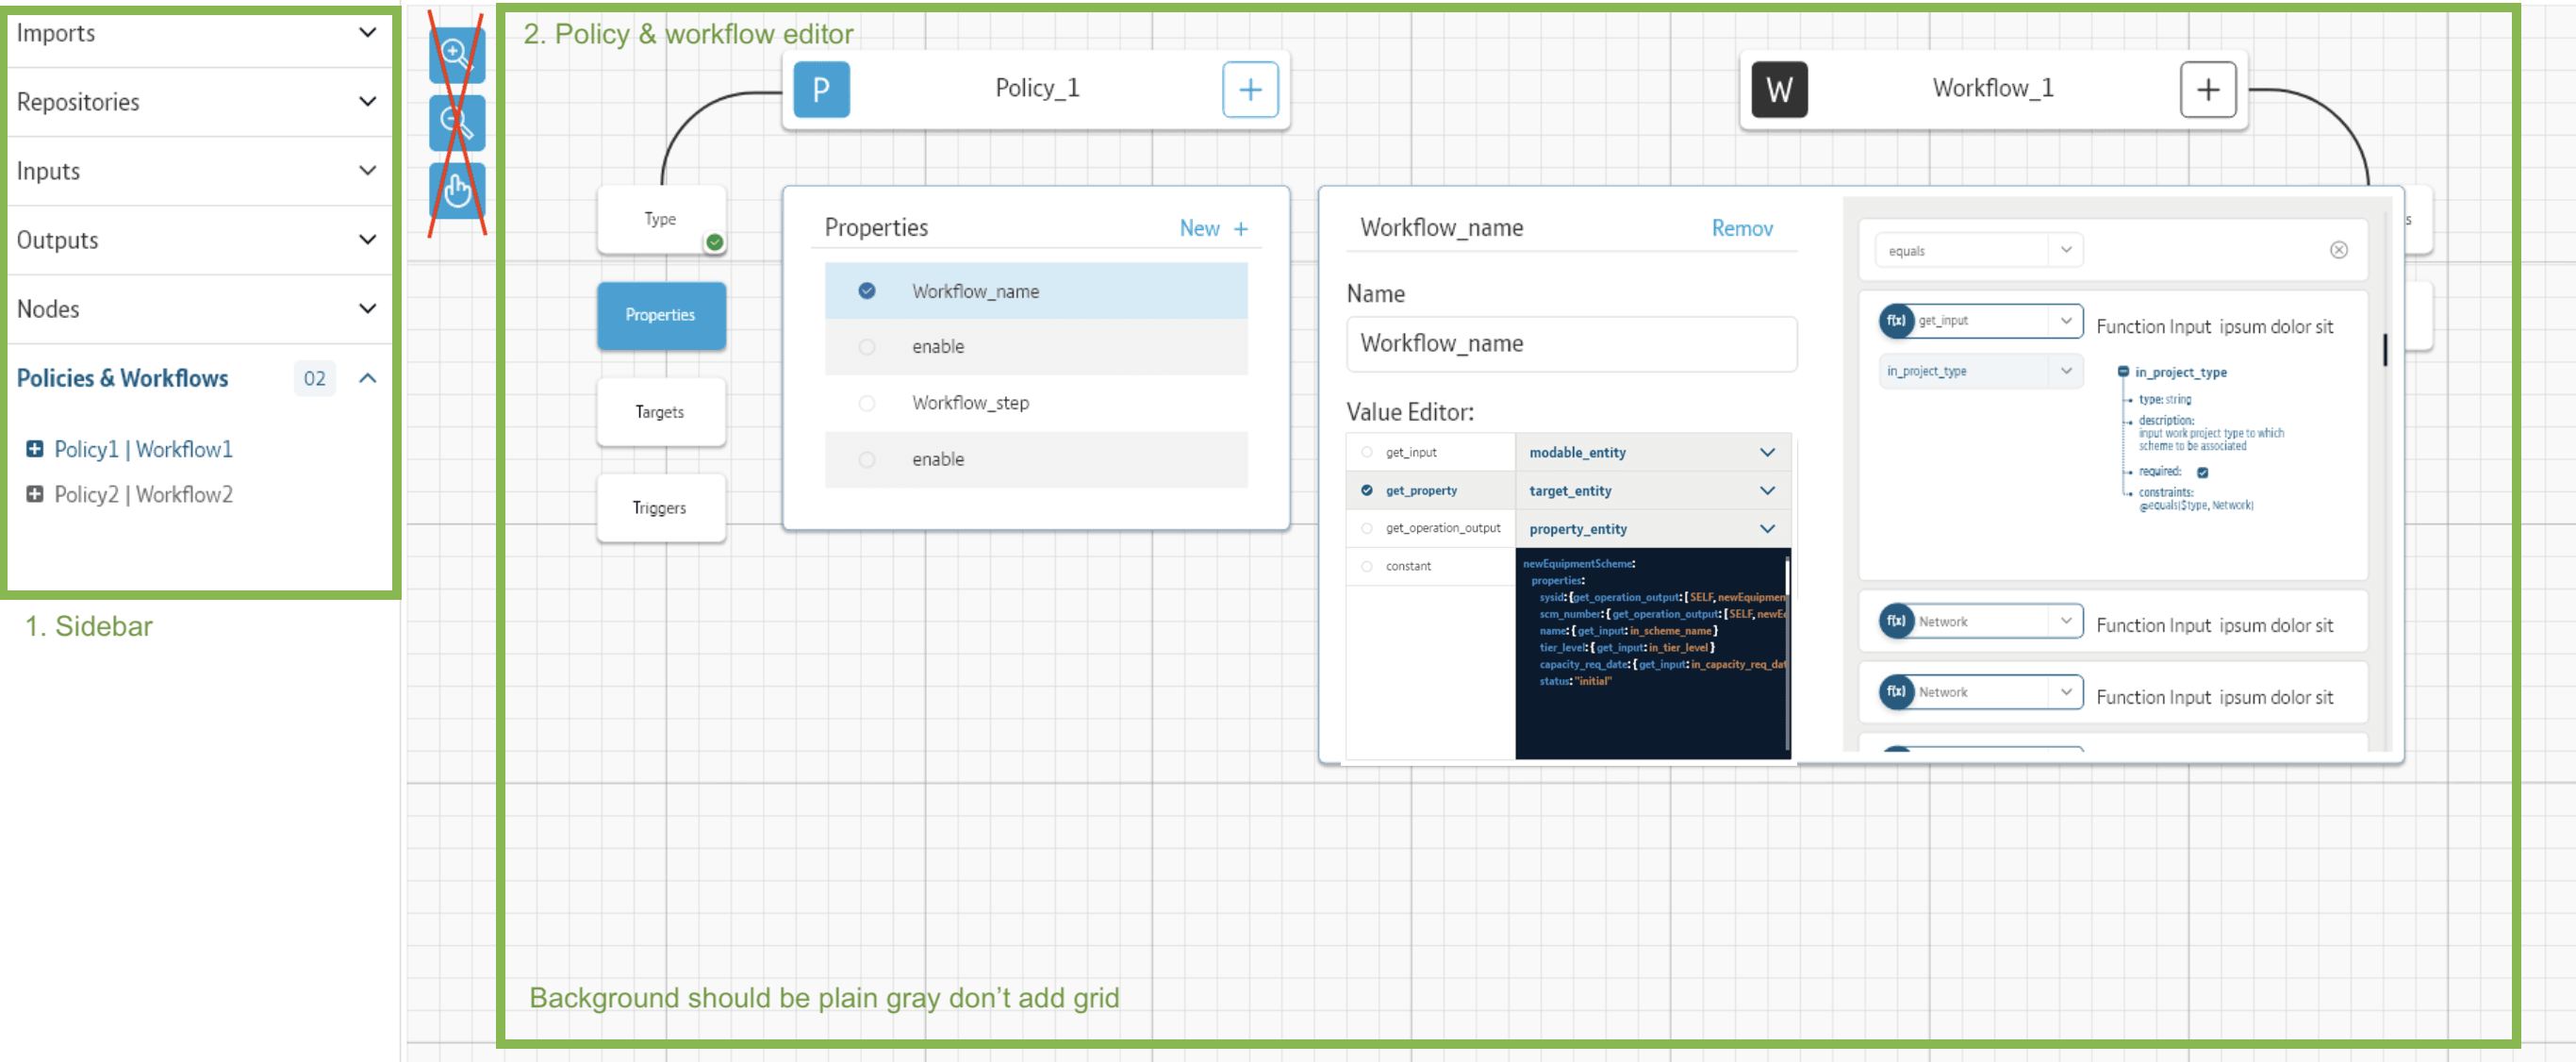
Only the sections marked in green are in scope. Other than that the sidebar should also be updated & button functions should work.
- Sidebar: Policies & workflows node
- Policies & workflows
- The background of Policies & workflows editor should be plain gray, do NOT add grid background.
- The red crossed section in the above image shouldn't be added.
- For color & other layout elements, you may follow the existing application.
1 Default view
- Initially both the Policy & Workflow controls stays at the center of the Policy & Workflow editor. Ref: https://d.pr/free/i/wrrA6r
- On clicking the Policy control or Workflow control both the workflow & policy control moves to the top and some options appear for both the policy & workflow controls. Ref: https://d.pr/free/i/XrzwCI
2 Policy: Type
- By default the
Typestays selected. All other options should be disabled for both policies & worlfow should stay disabled.- Clicking the type drop-down should show drop-down options, the of these drop-down options should come from BaseFile.yaml's
typenodes ref: https://d.pr/free/i/2tInfL . In this case it shold be bt.tosca.policies.base & bt.tosca.policies.base_1.- Ref: https://d.pr/free/i/w5Gwv4 . Here icons are NOT required the search function shold work.
- On selecting a type from BaseFile.yaml the value of policies node in Existing.yaml shold be updated https://d.pr/free/i/HS6nMN . It should update all the values of the policies node & NOT just the type field.
3 Policy: Properties
- This open gets activated & selected once a user selects a type.
- Ref: https://d.pr/free/i/dtQuXo & https://d.pr/free/i/0qjk15
- Based on the type selected show the values of properties option.
- A user should be able to add more properties by clicking the "New +" link: https://d.pr/free/i/dtQuXo
- On clicking New + the list should be appended with one more list item. The value of this item should be editable. You may add a text-box along with the radio button.
- Add an "X" button on the right side. Clicking this should remove this item.
- Only list items added by a user can be removed.
3.1 Policy: Selecting a property value
- On selecting a property the "Value & constraint" editor should appear like this: https://d.pr/free/i/ejzlIM
- The name field should NOT be editable.
- The value of default should come from Value Editor
- The values of constraints should come from Constraints editor
- Refer to the exiting Value Editor & Constraints Editor for reference.
- Remove link in this window should be disabled.
4 Existing functions
- The existing functions implemented on clicking the button on the upper right section should continue to work even after implementing the above requirements.
Final Submission Guidelines
- Full source code with all the requirements implemented.
- Detailed readme in markdown format that describes how to configure, build and run the app.
- Verification video or doc.
Licenses & attribution
- Third-party assets used to build your item must be properly licensed or free for commercial use. MIT, some modified BSD, Apache 2 licenses are ok. If a library is not commercial friendly you will need to get our approval first.
- Sufficient information regarding third-party assets must be present in your documentation. This includes the author, license info and a direct link to the asset online.
FAQs
After submission as a submitter what should be my next step?
Once the challenge submission phase is over the assigned reviewers are going to review all the submissions based on the challenge scorecard. They are expected to raise all issues found in the submissions they are reviewing. After the completion of review phase the Appeal phase status. In this phase, the submitters should go to the Online Review page, select the project & have a look at the issues raised by the reviewers. If you disagree with the reviewer on any issue/comment, raise an appeal by clicking the 'Appeal' button associated with the section and entering the appeal comment.
When & where I can see the challenge results?
After the Appeal response phase is over the results are displayed on the challenge specification page as well as on the online reivew page.