Challenge Overview
Welcome to the YERC: Role-Based Access Control (API + Integration) challenge. Topcoder and YERC (Yellowstone Ecological Research Center) are working together to create a new platform to monitor, understand, and improve the health of our planet’s ecosystems called EPIIC (Ecosystem Prognosis Impacts Information Cooperative). This collaboration is part of the “Crowd for Good” initiative (Topcoder's non-profit program) and we are inviting all Topcoder Developers to join and take part in this project to create a better future for our environment.
In this challenge, we are looking for you to set up role-based access control NodeJS API & integrate it with a frontend ReactJS POC application.
Grand Prizes
- 3 Yellowstone Guided Tour Packages (travel not included)
- 5 Yellowstone Virtual Ecological Workshops
These prizes will be awarded at the conclusion of the project to the Topcoder members who have accumulated the most wins in the series.
Challenge Prizes
This challenge is a part of "Crowd for Good” program and don't have cash prizes, instead, we have the following prizes for members that participate in the challenge:
-
YERC Topcoder Points that can be collected in this challenge series to get the GRAND PRIZES once the project complete (1st place 800 points and 2nd place 400 points)
-
YERC swag (hats and maps) for the top 2 winners
-
Topcoder TCO21 Points
-
Every member whose submission used in the EPIIC platform will get credited on the final platform product in a credits page
-
Every member whose submission used in the EPIIC platform will get a certificate of participation from YERC and Topcoder
Technology Stack
-
NodeJS
-
MongoDb
-
CSS/SCSS
-
ReactJS
General requirements
Code Formatting
-
Make sure code is well documented, all classes, methods, variables, parameters, return values must be documented in every single code file, and appropriate inline comments should be provided too where the code is not straightforward to understand.
-
Please use clean INDENTATION for all the code so future developers can follow the code.
-
Use appropriate linter to validate your code.
JAVASCRIPT SPECIFIC
-
Code written in JavaScript should pass the lint Validation.
LAYOUT
The frontend is a POC application & the resolution to support is 1378x768 & above.
PLATFORM
The application should support Chrome, Firefox & IE Edge (Chromium)
Business Requirements
References
-
Implementing Role-Based Access Control in a Node.js application
-
Node.js - Role Based Authorization Tutorial with Example API
1.Login & Auth
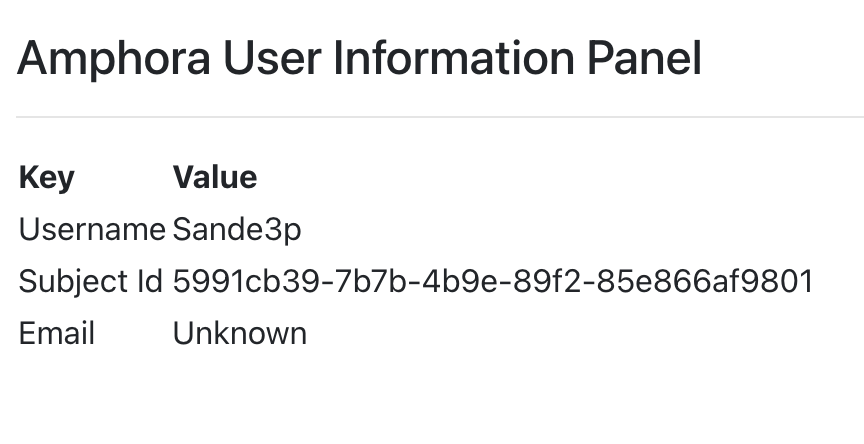
The login & Auth service is provided by the third-party service Amphora Data. To use the login & auth you can start with the react-amphora app. Here’s a demo of this app https://react-amphora-example.vercel.app/ . Only keep the function related to login & auth. Remove everything else from this repo. On successful login, the application should show the info of the logged user as shown below & a sign out button allowing the user to sign out.
2. Role setup
This application has six user roles: Guest, EPIIC_Member, EPIIC_Scientist, EPIIC_Steward, EPIIC_Site_Admin, EPIIC_Field_Biologist. The guest is a public user-role. After a user logs in successfully, the amphora auth service returns the token & userinfo

Use this information to set up the user role. By default the user role EPIIC_Member should be assigned to all new members.
When a user logs in successfully the backend should check the user mapping by “sub”

If a user already exists then the backend should return the userinfo with user_role to the fronted App & the frontend app should display info of the logged user. The fields ‘name, preffered_username, sub & user_role’ should be displayed on the frontend app.
If the user is new then create a new entry for the user & assign the default user role EPIIC_Member.
The format of user-object to be stored in db is:
{
"sub": "<sub value>",
"name": "<name>",
"preferred_username": "<preferred_username>",
"userRole": "<default user role">,
"addedOn": "<the time at which user iis added. (In ISO format)">,
}
Use mongodb as the database for storing the user-mapping & querying. You can either use the free online mongodb version or local version of mongodb it’s totally up to you. Provided the setup instruction in the readme accordingly. When using the online version you may share your connection string.
3. Updating User role
Create an end-point PUT /UpdateRole. To update the user role of a user by sub. The body of this request should contain:
{
"sub": "<sub value (user identifier) of the user to be updated>",
"userRole": "<New userRole to be assigned">
}
Role can only have one of these value: EPIIC_Member, EPIIC_Scientist, EPIIC_Steward, EPIIC_Site_Admin, EPIIC_Field_Biologist
On success the response should be:
{
"status": "s",
"msg": "User successfully updated",
"sub": "<sub value>",
"name": "<name>",
"preferred_username": "<preferred_username>",
"userRole": "<default user role">,
"updatedOn": "<the time at which user iis added. (In ISO format)">,
}
If the user role doesn't exist, send an appropriate error message in the following format:
{
"status": "f",
"msg": "<error.message>",
}
For now this route shouldn’t be protected. Only create API for the UI integration not required.
4. Getting User info
Create an end-point GET /GetUser/:sub. To get the details of a user by sub. On success the response should be:
{
"status": "s",
"msg": "User successfully added",
"sub": "<sub value>",
"name": "<name>",
"preferred_username": "<preferred_username>",
"userRole": "<default user role">,
"addedOn": "<the time at which user iis added. (In ISO format)">,
}
If the user role doesn't exist, send an appropriate error message in following format:
{
"status": "f",
"msg": "<error.message>",
}
For now this route shouldn’t be protected. Only create API for the UI integration not required.
5. Manually adding a new user
Create an end-point POST /NewUser. To add a user. The body of the request should contain the following:
{
"sub": "<sub value>",
"name": "<name>",
"preferred_username": "<preferred_username>",
"userRole": "<default user role">,
"addedOn": "<the time at which user iis added. (In ISO format)">,
}
On success the response should be:
{
"status": "s",
"msg": "User successfully added",
"sub": "<sub value>",
"name": "<name>",
"preferred_username": "<preferred_username>",
"userRole": "<default user role">,
"addedOn": "<the time at which user iis added. (In ISO format)">,
}
If the user “sub” already exists, send an appropriate error message. For now this route shouldn’t be protected. Only create API for the UI integration not required.
6. Delete user by sub
Create an end-point Delete /DeleteUser/:sub. To delete a user by sub.
On success the response should be:
{
"status": "s",
"msg": "User successfully deleted"
}
If the user role doesn't exist, send an appropriate error message in the following format:
{
"status": "f",
"msg": "<error.message>",
}
For now, this route shouldn’t be protected. Only create API for the UI integration not required.Final Submission Guidelines
Final Submission Guidelines
Submit a zip container containing:
-
Source code of API
-
Swagger or Postman collection to test the API endpoints.
No need to submit any verification video.