January 4, 2021
Running Automated Testing Challenges

DURATION
5-10 mincategories
Tags
share

Background
Traditionally, Topcoder has employed a peer review process that is driven by members of the community that perform manual reviews on each submission. Here are some brief details of that process.
Topcoder’s manual review process involves members having to upload their submission on the Topcoder platform and then, reputable members from the Topcoder community reviewing the submissions.
The reviewers manually go through the code base and compare it with the requirements outlined for that contest to verify that the requirements are implemented. They then run the application to verify that the changes are not just implemented code-wise but also actually work.
They make use of a predefined scorecard where, based on the issues they come across with the solution, they assign scores to specific sections in the scorecard. The scorecard will then total the scores across each section and that becomes the final score for that solution.
Topcoder now also has a process for performing automated reviews on submissions.
Overview
The workflow with automated review is different than the manual review process.
Submitters still upload their solution on the Topcoder platform, but their solution needs to follow a specific folder structure (for the processor to correctly parse the files). Additionally, they need to also provide a Dockerfile that builds their solution and starts the application.
Each challenge must reference a git repository that contains the test cases. These cases, when executed, will validate and verify that the submitted solution meets the expectations.
We currently support Taiko, Gauge, and Selenium for testing. The actual submission can be any technology, as long as it is setup to run in a Docker contatiner.
Our automated processor will listen for submission upload events on the Topcoder platform. The workflow of the processor is:
When a submission arrives, the processor downloads the submission from Topcoder and “unwraps it” to reveal the folders and the Dockerfile.
The processor then uses the Dockerfile provided by the submitter to build their solution and launch the application. Through docker, a container for the solution is created and the container is expected to expose a port at which the application can be accessed.
The processor then proceeds to create a docker container for the tests to run in. The tests will access the app at a specific port (which is exposed by the solution container for the application) and test the application (i.e. the solution provided by the submitter)
Once the tests complete, the test results are generated as a report and stored to disk.
The processor, at this point, is waiting for the container that is running the tests to stop, indicating that it has completed execution.
Once that happens, it proceeds to read the results, at the same location where the tests stored them. It is a JSON file and the results indicate which tests passed and which tests failed
The processor calculates a percentage of the tests passed and that becomes the score for that solution.
At this point, for each uploaded solution, the processor has calculated the scores and stored it in the Topcoder database.
That concludes the automated Topcoder review process involving the test processor.
How the Submission is Run
It starts off by building the dockerfile provided by the submission. The dockerfile should build the user’s submission. It is expected to install any dependencies needed to run the user’s submission. They can use any image as their base image, as long as it is publicly accessible through Dockerhub.
In the case of User Interface testing, the dockerfile is expected to also start the server that will host their user interface and export a specific port. The same PORT will be used by the docker container created by the processor for testing the submission.
In case of non-user interface testing, the user’s submission should ensure that the function that needs to be tested can be accessed externally (such that, the tests can include the user’s submission and import the function to test it.
It then creates a container using the built dockerfile. Let’s call this the solution container.
Next, it will build the image for the tests and then run a container using this image. Let’s call this the test container.
The solution container would basically have a web app running at the specified port. The test container will access the web app at the specified port (and host, where the host is the container’s name) and run the tests against it.
The test results will be generated by the test container and stored in the artifacts folder.
Scores
Scores can be seen on the main challenge page.
Setting up an Auto Testing Challenge
Follow these steps to setup a challenge that will be auto tested:
Create a challenge or Edit an existing challenge using Topcoder Direct or Work Manager.
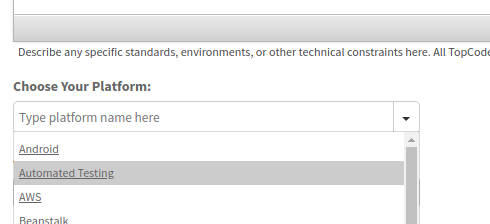
Set the Platform to “Automated Testing”. This exists in Topcoder Direct (and now at https://challenges.topcoder.com). If this is not set then the platform will not attempt to run automated tests.

Create the automated tests:
Create a new project for your tests here: https://gitlab.com/topcoder-product-dev/automated-testers
Use https://gitlab.com/topcoder-product-dev/automated-testers as an example and template.
There needs to be a Dockerfile first that sets up the testing. Any additional files or folders are allowed.
It is advised that any instructions that take a long time to build are captured in a separate Dockerfile that you will host on Topcoder’s own Dockerhub repository. That way, when the processor runs for the first time, it will build the base image once. Subsequent runs will only build the test image taking lesser time to process submissions.
Additionally, you need to create a .topcoderrc file, which should contain a javascript object in JSON format. The structure will be:
{
"automatedTesting": {
“testFramework”: “taiko”
  }

}

supported values are

guage

taiko

selenium
Specify the test repository on the challenge. Do this by setting the “Code Repo” field on the challenge. Specify the complete url (Example - https://gitlab.com/callmekatootie/taiko-testing-example).
Examples
See example auto testers in our Gitlab repository.
How to Submit
Submitters need to structure their submission in a specific way in order for the auto tester to be able to run it. Each submission needs to follow a specific folder structure:
They need to submit a zip file
The zip file needs to contain “code” folder at the ROOT level
Inside the code folder, there needs to be a file named Dockerfile. This is the docker file used to build the user’s submission.
The “code” folder in the folder structure mentioned above is the code folder inside the user’s zip file
Thus, the user’s submission is actually downloaded into the “submission” folder mentioned above
Here is an example of the submission folder structure:

What does the Docker container need to contain?
Make sure you can run your submission with Docker from a clean slate.
Your Docker needs to expose port: 8080
It needs to build on a completely clean machine when the platform runs your submission.
If you are using something locally to build and run your submission, make sure it’s included as part of your Docker configuration as well.
Example Dockerfile for Node app:
FROM node:12

WORKDIR /usr/src/app

COPY package*.json ./

RUN npm install

COPY . .

EXPOSE 8080

CMD ["node", "index.js"]
Example Submission:
How to view your submission results
There are 2 main things submitters have access to:
The score
This is simply the review score that is presented on the challenge page. This becomes available after the submission is successfully tested.
The artifacts that the scorer produces.
Artifacts are produced in the form of files that can be downloaded by the submitter (and challenge managers).
Use the Submission Review App to access the artifacts
The files that are downloaded will contain logs showing the docker build of the submission as well as the execution log.
If tests were able to be executed, then there will also be a file (results.json) that shows detailed information about which tests passed and failed.